Monday, September 26, 2011

Grain-Free Zucchini Fritters


Even if you don't like veggies, I think you might like these.  Or at least tolerate them.  I suppose I can't promise that.  Some people are just picky!  But my whole family gobbled them up for dinner; I didn't even get to freeze any for another night! It was a delicious way to use up some of the last zucchini from our garden.

I used three medium-sized zucchinis, but I wish I had used more!  Before you begin, shred the zucchini, sprinkle with a teaspoon of salt, and let the zucchini sit for at least 10 to 15 minutes.  Then, wring the heck out of it.  It's amazing how much water you'll squeeze out.  Squeeze, squeeze, squeeze until you just can't anymore.  Some people use a cheese cloth, but I just hold the zucchini strands in my hand. Do not skip this step.  Trust me.  See those nice firm zucchini fritters in the picture above?  Not my first try.  I've tried to make these a few times in order to get it right sans flour and egg, and I attempted these once on a night when I had less time, and there was much muttering and grumbling in my kitchen due to runny, watery fritters.  Once you've gotten that excess water out of the zucchini, you're ready to make your...batter.   (Would this classify as batter???)


Zucchini Fritters Ingredients
3 medium-sized zucchinis, shredded and excess water removed
2 eggs, or 2 flax eggs (2 Tb. flax + 5 Tb. water, microwave for 20 sec. so it's a bit goopy.)
3/4 c. almond flour + more to coat
1 Tb. dill
1/2 tsp. garlic powder
1/3 c. gorgonzola or feta cheese (optional, omit if vegan or dairy-free)
3-4 Tb. chives, chopped
Olive Oil

Makes about 10 fritters.

Combine all the ingredients except for olive oil in a bowl. I've used eggs and flax eggs and both worked just fine.  I've also made them with and without the cheese, and though I like them with the cheese, they are tasty without it and the structure was fine.

Heat a few tablespoons of olive oil in a frying pan over medium-high heat.  When the oil has heated up, take a scoop of the mixture, form it into a patty shape, and coat on both sides with excess almond flour.  (You could use wheat flour, or spelt flour for this obviously, but the almond is lower in carbs and higher in protein.)   Cook the fritters for about 3 minutes on each size.  I keep another pan with a lid on my warming burner so they stay warm until they're all done cooking.  I add more olive oil to the pan as needed so the fritters don't stick.


I like to make these zucchini fritters smallish in size, because they can be delicate - especially if using the flax egg - and it's easier to turn them when they're smaller.  I make mine about the size of silver dollar pancakes. 


A traditional way to eat these would be with a yogurt topping, but I had some homemade tomato sauce I had made over the weekend that was pretty delicious with it.

Monday, September 19, 2011

Peanut Butter Mascarpone Frosting


I have been a bit obsessed with mascarpone "cheese" lately.  I've used it in both main courses and some dessert-ish dishes.  Mixed with some peanut butter, whipping cream, and butter you've got yourself a frosting that won't make you miss sugar.  I've made several batches, and I have to use serious self-control to not eat the whole thing at once.  I try to balance my carbs, proteins, and fats, or in other words, not eat carbs alone to prevent spikes in blood sugar.  So I have no problem laying on a thick layer of this stuff atop banana bread made with almond flour, or atop cinnamon almond flour pancakes with bananas.  (I'm on what feels like my bazillionth batch of banana bread, and am getting close to perfecting it...)


Ingredients:
1/3 c. butter, softened
1/3 c. mascarpone cheese
1/3 c. peanut butter 
2-3 Tb. heavy whipping cream
1 tsp. vanilla
Sweetener to taste (Traditionally, a buttercream frosting is made with powdered sugar, but that's out for me! I use about 15 drops of vanilla stevia.  You could use honey, agave, etc.)

Directions:
Using a mixer, combine the softened butter, mascarpone, and peanut butter.  Slowly add whipping cream, vanilla, and stevia and mix on high.  


Note: When slathered on hot pancakes, this frosting will be melty!  Still delicious, if not as picturesque...  

Friday, September 9, 2011

Caprese Chicken Stuffed with Creamy Pesto Mascarpone

I should warn you.  This recipe is not for those who don't eat cheese...


I knew tonight's dinner would need to include this:


...We've got a tomato version of the amazon jungle in the backyard, and I'm not complaining!  My basil's hanging on, too, and tomato and basil are simply classic and delightful even if a bit uncreative.  (On Fridays I always go back and forth between wanting to cook up some kind of elaborate feast to celebrate the impending weekend, or eating PB&J because I'm so exhausted!  This was a nice middle of the road...)

I happened to have chicken breasts, mozzarella (the good stuff!), mascarpone, and prepared pesto in the fridge.  So, first I mixed some of the mascarpone cheese and pesto.  (I used a 1:1 ratio, about 2 or 3 Tb. of each for two chicken breasts.)


Then butterfly your chicken, but don't cut all the way through, like this:


Spread mascarpone-pesto mixture on the chicken breasts, but don't spread it too close to the side with the opening, or it will run all over when baking.  (You'll probably have some run out a bit anyway.)  I used some toothpicks to hold them together, though I don't know that they actually accomplished anything!


 Bake the chicken at 350 degrees for about 30 minutes, or until the chicken is cooked through and there is no pink.  While the chicken is cooking, slice tomato, mozzarella, and basil.  Fix any sides you want to accompany this delicious dish...I opted for a spinach salad.  Top cooked chicken with tomato, basil, and mozzarella, and drizzle with a bit of balsamic vinaigrette.  I served with extra mascarpone-pesto on the side.  Voila!  My two year old gobbled this up (sans tomato) and told me, "This smells bootiful mama!  Yummy, yummy!"  That's really the only critique I need!


Now that we are full and happy we're off to watch the football team at the school where my husband works.  Good food, a happy toddler, and small-town football.  Love it.

Thursday, September 8, 2011

DIY Cinnamon "Sugar"


In case you haven't guessed...it's not really sugar in this jar!  It's stevia, and a bit of Truvia, which contains erythritol and stevia.  Easy to shake on toast with peanut butter, or put in my daughter's oatmeal.  (She thinks unsweetened, or plain, cinnamon is "spicy," but she won't eat oatmeal that isn't flavored a bit.  I don't want to load it down with sugar, so she was the inspiration for this new addition to my spice rack!)  I've always heard the ratio of 1 Tb sugar to 1 tsp cinnamon when making your own cinnamon sugar.  I'd say I have more of a 1:1 ratio in this mix, but I didn't measure.

Sprinkled on toasted sprouted grain bread with almond butter and thinly sliced banana. Mmmm.  Clearly, my tastes have changed since relinquishing most sugar...this can pass for dessert for me sometimes.


Sunday, September 4, 2011

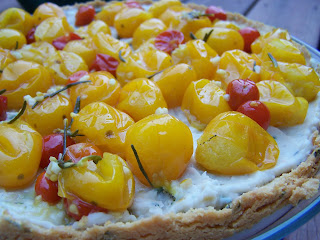
Tomato Tart with White Bean Puree


I was in heaven walking through the farmer's market yesterday and sampling all kinds of tomatoes...heirloom tomatoes, beefsteak tomatoes, and cherry tomatoes in every color of the rainbow.  I have red cherry tomatoes growing in our backyard, and I picked up a pint of these gorgeous yellow tomatoes.  (Did you know that yellow tomatoes are less acidic than red tomatoes?  Though yellow tomatoes do not have the antioxidant lycopene...)  


I've been wanting to make a tart since I saw a recipe in Real Simple a while back, and since these little tomatoes are pretty sweet, I wanted to smear something on the tart to make it more savory, so I made a white bean puree with garlic and rosemary that's similar to something my husband has made to put on a grilled chicken flat bread pizza.  All on top of an almond flour tart, which makes it higher in protein and lower in carbs than a typical wheat crust.

Almond Flour Crust

1 1/2 cups Almond Flour  (I made my own by pulsing blanched almonds in my blender until finely ground.)
1/2 tsp salt
1 Tb fresh rosemary, minced
1/4 cup grapeseed oil
1 Tb water

Mix the dry ingredients together.  In a small bowl, whisk together the oil and water.  Combine the wet ingredients with the dry ingredients.  Press the mixture into a shallow pan.  (A tart pan if you have one. I used a 9" spring-form pan this time and it worked just fine.  Bake crust at 350 degrees for about 20 minutes.

While the crust is baking and then cooling, roast tomatoes and make the bean puree.

Roasted Tomatoes
2 pints cherry tomatoes, any color
1 clove garlic, minced
1 Tb rosemary leaves
1/2 tsp kosher salt
1-2 Tb olive oil

Combine all the ingredients on a baking sheet and roast tomatoes at 350 degrees for about 25-30 minutes.

White Bean Puree
1 16oz can of Great Northern or Cannellini Beans, drained and rinsed
2 Tb olive oil
2 cloves of garlic, minced
1 1/2 Tb fresh-squeezed lemon juice
1/2 tsp salt
1/2-1 tsp ground white pepper
1 Tb ground flax meal
1 Tb fresh rosemary leaves

Saute the garlic in the olive oil for a few minutes, then add the beans and seasonings to the pot.  Simmer on low until heated through and the beans are easily smushed with your cooking utensil.  Transfer the bean mixture to your blender or food processor.  Add the rosemary at this time.  Pulse until smooth, adding water in very small amounts as needed.  (I used a blender and needed to add a few tablespoons of water in order to get the blender to puree the beans properly.)  

Finally, assemble the tart!  Spread the bean mixture on the crust.  (I found it best if the crust had cooled.)  Top with the tomato mixture.  (You may need to drain some liquid from the roasted tomatoes.)  Devour!  I really enjoyed this recipe, and might be making more tarts in the near future...I contemplated adding cheese to this one, and considered incorporating eggplant, zucchini, and basil...so many options!  

I'm submitting this recipe to Wellness Weekend as well!  Stop over at Diet, Desert and Dogs to find some fresh new recipes!


Saturday, September 3, 2011

Banana Bread Cookies


The other weekend, I was in the mood to bake, but having rid my cabinet of sugar and flour, did not have a cookie recipe on hand to make.  After tinkering in the kitchen during my little girl's entire naptime, I came out with these banana bread cookies.  My goal was to make something yummy, that was grain-free and sugar-free - including sugars like agave and honey.  I wanted them to contain a good amount of protein, and I wanted to share one with my vegan friend.  A lofty goal.   Overall, I found them a satisfying little treat, though they don't taste like a traditional "cookie..."  They are a bit biscuit-y.  If you are not used to the taste of stevia, feel free to substitute with whatever sweetener you prefer!  If I were baking these for others, I'd probably add some agave.
  

Ingredients:

2 1/3 cups almond flour
2 Tb coconut flour
1/2 tsp salt
2 tsp baking soda
1 tsp cinnamon
1 banana, ripe
1/4 c. coconut oil (could substitute butter)
1 tsp vanilla
1 flax "egg" (1 Tb flax plus about 2  1/2 Tb very warm water, left to gel for several minutes)

Directions:
  1. Combine all the dry ingredients in a bowl.  
  2. Combine wet ingredients in another bowl.  (Banana, melted coconut oil, vanilla, and "egg.")
  3. Mix the wet and the dry together.
  4. Drop onto a cookie sheet and bake at 350 degrees for about 12 minutes.


I whipped up a quick little "frosting" from coconut butter, almond milk, cinnamon, stevia, and vanilla, but to be honest I don't think the cookies needed it.

In my free time...which is sparse now that school's back in session... I sometimes scour the internet and my favorite blogs for recipes to store away, like a squirrel preparing for winter.  Here are a few I have tried or plan on trying:

Peanut Butter Cookie Dough Cookies by Chocolate Covered Katie
Dairy and Gluten-Free Chocolate Chip Cookies from Elana's Pantry
Gluten-Free Cashew Chocolate Chip Cookies from Diet, Desert and Dogs  (I love all things with cashews these days...)

Speaking of Diet, Desert, and Dogs I am submitting this recipe to Wellness Weekend!  Check it out for lots of delicious recipes!  Also submitting to Sugar Free Sunday.

DIY Taco Seasoning


What it is about tacos?  Mmm mmm mmm.

We have been making our own taco seasoning for quite some time now.  Originally, it wasn't a health decision; just didn't want to spend a few extra dollars for a taco seasoning packet when we had ingredients to make it at home!  But, now that I pay more attention to food labels, I realize it's much healthier as well.  Most taco seasoning packets have corn starch, and additives to provide color.  (Why would that be necessary?  Just look at the color of those spices!)

We don't measure any more, but here's what we put in ours...approximately...  If you make a big batch then tacos become super easy the next time you make them!  If you consider "1 part" to be 1 teaspoon, then this recipe would season 1-2 pounds of taco meat depending on how spicy you like it.

4 parts chili powder
4 parts cumin
2 parts paprika
2 parts oregano
1 part garlic powder
1 part black pepper
1 part salt
1 part red pepper flakes
1 pinch xanthan gum


I have to say...ground meat of any kind is pretty unappetizing to photograph....but on top of sprouted corn torillas with guacamole and fresh salsa, it is delicious.  Ate it too quickly to photograph it though!